Subversion
Introduction
In this workshop, we'll look at using a particular Version Control System (VCS) called Subversion (often abbreviated to SVN). Before getting into the nitty-gritty of using SVN, we'll pause to consider the motivations for adopting version control and also the key concepts that are common to most available systems.
Why is Version Control useful?
OK, here's the sales pitch:
- It removes confusion about versions. For example, you will no longer have to keep inventing names for different versions of essentially the same document e.g. blah.old, blah.sav, blah.older, blah.newest2 (look familiar?).
- It makes collaborative working easier. Version control assists in coordination as it removes any confusion about versions, highlights conflicts, allows the use of independent working copies, records log messages and much more besides.
- It makes distributing your code easier. A version control repository can be visible to the world (often as a URL). However, using some highly customisable access controls, you can arrange for some (perhaps anyone) to download your project while also specifying that only a select few may be trusted to upload.
- It makes reproducing experiments easier. The ability to reproduce an experiment is a key characteristic of science. However, all too often, in the digital age, people are unable to run the same version of a model that they ran six months ago. With version control, you can always access any previous version of your model.
- It aids disaster recovery. You computer is fried? No problem! Just checkout your code to another and you're working productively again in minutes.
Version Control Concepts
A picture can be worth a thousand words, so let's try illustrating some of the key version control concepts, before wading into acres of text:


Subversion is a centralised version control system. Centralised version control means that a copy of your project is held in a central location called the repository and the subversion server logs all operations happening on the repository: every time something is changed in the repository, the server logs the time and date, the changes, the author as well as a log message. The server can be configured to give privavcy; allowing some people actions which are disallowed for others. For instance, in the practical, the server allows anonymous read-only access but only a selected number of people can changes things.
All the operations described above (logging and authentication) happen on the server. However, the server is only accessible directly to system administrators. To interact with the server, a user makes use of a subversion client. Some of you might already know about some graphical subversion clients such as TortoiseSVN (see the screen grab below). This practical will show how the command line client can be used. The subversion client can be used to (1) ask information from and (2) send information to the server. The client can also be used to get information about your working copy which is the local copy of the project that resides on your filespace. You can use the client to ask questions such as:
- which files have I modified since I last synchronised with the server?
- when was that file last modified?
- who, inadvertently, created a bug at line 18 in file foo.c?
- what has changed in that file?
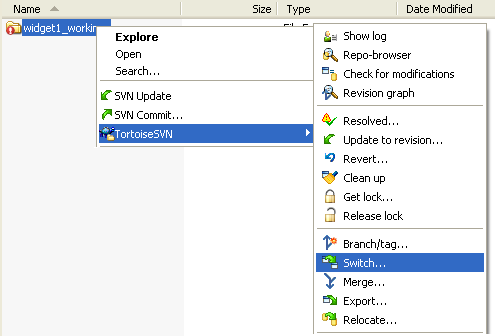
TortoiseSVN for MS Windows
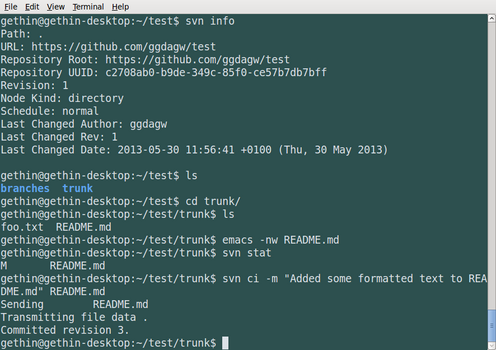
svn command line client for Linux


Acquiring a Repository
For the purposes of this practical, you can get yourself a repository from one of the hosting sites that can be found out in the cloud. Or you could use another repository that you have access to--perhaps hosted here in the University, some other portion of UK academia or elsewhere. I've prepared the examples using a repository accessed via the GitHub website (https://github.com). Note, however, that to obtain a free repository on GitHub, you must agree to it being readable by anyone.
NB With that in mind, you may want to have a think about the right home for any of your intellectual property.
OK, let's assume that you are happy to work with a GitHub hosted repository--at least for your initial steps learning about version control and subversion. (A natty feature of GitHub repositories is that they can be used with both Subversion and Git VCS.)
Registering and creating a repository is easy, just follow the instructions on the webpage:

Be sure to check the box: Initialize this repository with a README
In addition to the command line client that we will describe in the following sections, you can manage your repository, view and even edit your files through the GitHub website:

svn: The Subversion Command Line Client
The subversion command line client is called svn. To execute a subversion command, simply type:
$ svn command arguments
Some commands can also use options which are given with dashes:
svn command arguments --option optionvalue
Subversion provides extensive help about the commands to use. To get help for a particular subversion command, simply use:
$ svn help command
Checkout a Working Copy
Now that you have access to a repository, let's create a working copy of the files in the repository. To do this we use the svn checkout command, or svn co, for short:
gethin@gethin-desktop:~$ svn co https://github.com/ggdagw/test ./test
A    test/branches
A    test/trunk
A    test/trunk/README.md
Checked out revision 1.
This command gets a copy of the content at the URL and places it in a new directory called test. The letter "A" simply means that these files have been added to your working copy. You'll also notice two subdirectories called trunk and branches. This pattern follows an convention. Usually, subversion repositories are organised so that the main strand of development is in the trunk. Sometimes it is useful to store variants of the trunk version (more of that later) and the branches folder exists to accommodate those. (This is purely convention as far as subversion is concerned, however, and "trunk" and "branches" are merely two folders under the URL.)
The content that you saw through your browser is now in your own file space. You may also notice hidden directories called ".svn". It is very important that you do not touch these directories.
gethin@gethin-desktop:~$ cd test/
gethin@gethin-desktop:~/test$ ls -al
total 28
drwxr-xr-x   5 gethin gethin  4096 2013-07-26 12:29 .
drwxr-xr-x 117 gethin gethin 12288 2013-07-26 12:29 ..
drwxr-xr-x   3 gethin gethin  4096 2013-07-26 12:29 branches
drwxr-xr-x   6 gethin gethin  4096 2013-07-26 12:29 .svn
drwxr-xr-x   3 gethin gethin  4096 2013-07-26 12:29 trunk
Modifying your Working Copy
Right oh. The working copy is yours to work with so let's go ahead and modify the README.md file.
gethin@gethin-desktop:~/test$ cd trunk
gethin@gethin-desktop:~/test/trunk$ ls
README.md
gethin@gethin-desktop:~/test/trunk$ emacs -nw README.md
(See, e.g. https://www.acrc.bris.ac.uk/acrc/pdf/emacs.pdf, if you'd like to use the emacs text editor, but are new to it.)
To see what files you have modified, you ask the client for the status of your working copy:
gethin@gethin-desktop:~/test/trunk$ svn status
M       README.md
The status shows the letter "M" for README.md, indicating it has been modified.
Note that this status only shows the things that have changed in your working copy. It does not show any changes made by others, either in the repository or in their own working copies.
You can also add a new file. Let's add a file called foo.txt:
gethin@gethin-desktop:~/test/trunk$ touch foo.txt
gethin@gethin-desktop:~/test/trunk$ svn status
?       foo.txt
M       README.md
The question mark shows that the subversion client knows nothing about the new file (i.e. it is not currently under the auspices to version control). By default, svn will ignore new files. To indicate that a new file should be versioned, use the add command:
gethin@gethin-desktop:~/test/trunk$ svn add foo.txt
A         foo.txt
gethin@gethin-desktop:~/test/trunk$ svn status
A       foo.txt
M       README.md
The letter "A" is used to indicate an addition.
Recording Changes in the Repository
Sending changes to the repository is called a commit. Here's the command I used to send our two local modifications:
gethin@gethin-desktop:~/test/trunk$ svn commit --message "Added text to README.md and added the empty file foo.txt"
Sending        trunk/README.md
Adding         trunk/foo.txt
Transmitting file data ..
Committed revision 2.
where the --message, or -m for short, allows us to write a log message inline.
Notice the revision number. These numbers encode the state of the whole repository at a given juncture and are the passport to retrieving earlier versions of your project. As you commit future changes to your repository, your revision numbers will steadily increase.
Sometimes, you want a long message to go with a commit. To do this, simply execute the commit without the --message option. A text editor will then pop-up to be used to write the message and by saving and exiting, the commit will be done. Note that svn uses the editor indicated by the EDITOR environment variable. The editor often defaults to vi if this variable is undefined. If you are an emacs fan, set the variable first:
$ export EDITOR=emacs
(Note that you can use :q! to get out of vi, if you started it by accident. You could also set EDITOR=nano or gedit etc. You can also use the SVN_EDITOR environment variable.)
Revert: Your "Get-Out-of-Jail Card"
Just as we can add files, we can delete, for example:
gethin@gethin-desktop:~/test/trunk$ svn delete foo.txt
D         foo.txt
gethin@gethin-desktop:~/test/trunk$ ls
README.md
The letter "D" indicates deletions and we see from typing 'ls' that the file has gone.
Subversion allows you to revert changes when you have made an error. Let's assume that 'foo.txt' was deleted in error. Fear not, you can get it back with:
gethin@gethin-desktop:~/test/trunk$ svn revert foo.txt
Reverted 'foo.txt'
gethin@gethin-desktop:~/test/trunk$ ls
foo.txt  README.md
gethin@gethin-desktop:~/test/trunk$ svn status
gethin@gethin-desktop:~/test2/trunk$
and foo.txt is back! A silent return from svn status, svn stat for short, indicates that there are no pending modifications in your working copy. Put another way, it exactly matches the repository version of the project when you made the checkout.
Updating your Working Copy
You can update your working copy to synchronise it with the latest version (known as the HEAD) held in the repository. The general form of the update command is:
$ svn update
... <- list of files that have been added/modified
At revision X.
If I update my working copy now:
gethin@gethin-desktop:~/test/trunk$ svn update
At revision 2.
we see an empty list of files--i.e. there is nothing to update and my working copy perfectly matches the HEAD of the repository.
That needn't be the case, however. Let's imagine that you and a collaborator in Japan have access to the repository. You obviously work independently and, for good measure, in different time zones. Your collaborator may have committed some changes to the repository since you were last in front of a computer. That being the case, an update will bring all of her changes to your working copy.
A similar situation can arise if you are simultaneously operating two checkouts. Perhaps one at work and another on your home computer. If you had done some work at home yesterday evening and committed the fruits of your labours, and update will bring your work copy in line.
You can even update your working copy if you have some local modifications pending. In that situation, SVN will attempt to merge your changes with those from the southern hemisphere. If you both have edited the same line in a file, a conflict is flagged. More on that possibility later.
With all the foregoing in mind, status, commit and update will probably be your most widely used commands:
- update regularly to bring other people's work
- status to make sure all is well
- commit frequently so that you can always recover a version you care about
Investigating Changes
This section highlights some commands can be used to boost productivity.
log
To get a log of what happened in the repository, use the log command. To see the files that have been modified as well as the log messages, use the --verbose option:
gethin@gethin-desktop:~/test/trunk$ svn log --verbose
------------------------------------------------------------------------
r2 | ggdagw | 2013-07-26 14:58:08 +0100 (Fri, 26 Jul 2013) | 2 lines
Changed paths:
   M /trunk/README.md
   A /trunk/foo.txt

Added text to README.md and added the empty file foo.txt

------------------------------------------------------------------------
r1 | ggdagw | 2013-07-26 12:28:32 +0100 (Fri, 26 Jul 2013) | 2 lines
Changed paths:
   A /branches
   A /trunk
   A /trunk/README.md

Initial commit

------------------------------------------------------------------------
You can also invoke the log command on a particular file/path and provide a range of revisions. For instance to see which commits affected file1 between revisions 4 and 6, one could use:
$ svn log --verbose --revision 4:6 file1
... <- log output
diff
After you have modified something, it can be handy to highlight what you've done. You can do this using the diff command.
For instance add some text to 'README.md' and use diff to see what you have done.
gethin@gethin-desktop:~/test/trunk$ svn stat
M       README.md
gethin@gethin-desktop:~/test/trunk$ svn diff README.md
Index: README.md
===================================================================
--- README.md	(revision 2)
+++ README.md	(working copy)
@@ -7,3 +7,16 @@
 ------------

 This file is formatted in [Markdown](https://github.com/adam-p/markdown-here/wiki/Markdown-Cheatsheet) and will be automatically rendered on your GitHub webpage.
+
+Here is an itemised list:
+* bread
+* butter
+* marmalade
+
+A Table:
+
+| Name    | Colour        | Price         |
+| ------- |:-------------:|--------------:|
+| Thomas  | centered      | right-aligned |
+| Gordon  | blue          |         £3.56 |
+| Henry   |         green | £2.81         |
You can also use diff to highlight differences between two versions of some file, as stored in the repository:
$ svn diff -r73:74 foo.txt
...
blame (praise)
Sometimes, you want to know who wrote a particular bit of code. Subversion makes that easy with the blame command:
$ svn blame file2
     2   jprenaud Added some stuff
     3   jprenaud Another line
     4   jprenaud A third line.
You see the content of file2 and for each line the name of the author and the revision number. You could then fetch the log message for that particular revision to get more information.
$ svn log file2 --revision 3
------------------------------------------------------------------------
r3 | jprenaud | 2008-05-14 16:03:45 +0100 (Wed, 14 May 2008) | 1 line

More things.
------------------------------------------------------------------------
However, this feature is not available for github hosted repositories:
gethin@gethin-desktop:~/test/trunk$ svn blame README.md
svn: Server does not support custom revprops via log
Conflicts
Sometimes, a commit or an update will fail because of conflicting changes. As a rule, you should always update before a commit so the example here will show a conflict created after an update.
Creating the conflict
As mentioned previously, conflicts arise when SVN cannot merge together changes to the same file--i.e. the changes are on the same line.
You can manufacture a conflict using two checkouts--let's call them A and B. I could create two such working copies by typing the following:
svn co https://github.com/ggdagw/test ./testA
svn co https://github.com/ggdagw/test ./testB
There is nothing to stop me having multiple checkouts on the same computer. Now, that we have the raw materials:
- Ensure that both A and B are up-to-date.
- edit line 1 of README.md in A and commit.
- edit line 1 of README.md in B--do not commit.
- Now attempt to update B.
Et voila, you will have a conflict. Since SVN cannot resolve it, we must apply the old human grey matter to the task. If you were working with a collaborator, this may well involve a phone or email conversation to decide on the best course of action.
The update does not immediately fail. Rather, you are be presented with some options:
Conflict discovered in 'README.md'.
Select: (p) postpone, (df) diff-full, (e) edit,
        (mc) mine-conflict, (tc) theirs-conflict,
        (s) show all options: df
If you choose "df", then you will be presented with a summary of the 3-way difference: First how it was prior to your local change; second how it is in your working copy and lastly how it currently is in the repository. You will also be presented with the list of options again. If you choose mine-conflict, "mc", your local modifications will be preferred--at least in this working copy, since nothing has been committed back at this stage. Theirs-conflict, "tc", will prefer the repository version. If you elect to postpone, "p", then 'README.md' is flagged with the letter "C" indicating a conflict and you will notice new files in your working copy:
$svn status
?      README.md.r5
?      README.md.r6
?      README.md.mine
C      README.md
- README.md.r5 is README.md as at revision 5 (i.e. the one at your last update)
- README.md.r6 is README.md at revision 6 (i.e. the one that is on the repository now)
- README.md.mine is README.md as it was in working copy before the update
- README.md contains an attempt at merging the changes (this will be similar to what you see with "df").
The last option, edit (e), will present to you the attempted merge in a text editor, for you to resolve as you see fit. Note that if you type "svn status" after editing README.md in this situation, you will see that the file is still marked as conflicted and you will not be able to commit your changes until you have resolved the conflict by typing e.g.:
svn resolved README.md
Other useful commands
info
From inside a working copy, e.g.:
svn info
will give:
gethin@gethin-desktop:~/test/trunk$ svn info
Path: .
URL: https://github.com/ggdagw/test/trunk
Repository Root: https://github.com/ggdagw/test
Repository UUID: be566c2d-dc09-ebaf-f5e5-ce57b7db7bff
Revision: 3
Node Kind: directory
Schedule: normal
Last Changed Author: ggdagw
Last Changed Rev: 3
Last Changed Date: 2013-07-26 16:03:50 +0100 (Fri, 26 Jul 2013)
list
gethin@gethin-desktop:~/test2/trunk$ svn list https://github.com/ggdagw/test
will give:
branches/
trunk/
and
gethin@gethin-desktop:~/test2/trunk$ svn list https://github.com/ggdagw/test/trunk
will give:
README.md
foo.txt
move & copy
If you rename a file or directory manually, you loose its history, this is because subversion needs to be notified that a tracked file or directory will have a new name. It is simpler to use the subversion move command. For instance, to rename "file2", do:
$ svn move file2 new_file2
A         new_file2
D         file2
You notice that the new file is added and the old one deleted. You could have done this manually but the advantage of this is that the history of the new file before the new name is still available.
A close relation to move is copy. This creates a new file, with a copy of the revision history of it's template:
$ svn copy havana havana2
A         havana2
import
When you ask for a new repository, it is empty by default. To populate it, you can use the import command. (import is because the action is done from the server, it imports something). The syntax is:
$ svn import PATH URL/trunk --message "Log message."
- PATH is the path to the local folder (by default it ses "./", i.e. the current folder)
- URL is the full URL of the repository. In the example, I also added "trunk/" at the end and the trunk would be created automatically.
mkdir
Often people ask how then can create the "branches/" directory in the repository to store some specific versions of their code. This can be done by invoking mkdir directly on the server. The syntax is:
$ svn mkdir URL/branches --message "Log message."
export
Sometimes, you want to get the files from the version control system but this will not be used as a working copy, for instance you are going to send the files to somebody who is not involved in the development. For instance, it is the command that was used for the Linux1 and Linux2 practicals.
You could do a checkout and remove all the hidden ".ssh" directories manually, but the easiest to to use the "export" command. It works exactly like a checkout except that you end up with a normal local folder, not a working copy. The syntax is:
$ svn export URL PATH
branching and merge
Subversion can support multiple development strands via the creation of branches. The svn copy command is used to make a (space efficient) copy of an entire file tree from, say, the trunk to a subdir called "branches". A popular reason for creating a branch is for a particular developer (or team) to work on something speculative or disruptive:
svn copy https://svn.ggy.bris.ac.uk/subversion/ourproject/trunk \
https://svn.ggy.bris.ac.uk/subversion/ourproject/branches/sally_dev \
-m "The reason why I'm branching is..."
When you have different branches in your project, you might want to merge the changes from one branch to another. For instance somebody has fixed a bug on a branch that is still present in the trunk. You might want to apply the changes done on branch back onto the trunk. Subversion allows you to do this and it is called a merge operation. We will cover this topic very quickly here but you can refer to the Subversion Red Book for more information about merging.

For example, the following command will merge in a change set from revA to revB from the sally_dev branch of ourproject into your working copy:
svn merge -r revA:revB https://svn.ggy.bris.ac.uk/subversion/ourproject/branches/sally_dev
You can then commit these changes--should you so desire--which will end up in the development line of whatever you chose to checkout in order to obtain your working copy.
To go further
The Subversion Red Book is the bible of subversion. Highly recommended.
In the book, you can see how to create your own repository, should you desire. For example, some simple repository setup commands will provide you with a working facility via the filesystem (i.e. the repository is on the same computer that you typically work on), or SSH (i.e. you have SSH access to the machine that will host the respository). See below. However, note two things:
- It is dangerous to create a repository on a files-ystem that is not backed-up. You could lose all your work that way.
- You can request a (backed-up) University of Bristol repository simply by contacting the service desk.
Creating our own Repository
svnadmin create $HOME/my_test_repo
Next you might import some files (that you have stored in a directory called 'projectX'). If you're working on the same filesystem you would use:
cd projectX
svn import . file://$HOME/my_test_repo/trunk -m "my import message"
svn list file://$HOME/my_test_repo/trunk
...
Which--via SSH--would translate to:
cd projectX
svn import . svn+ssh://user@host/absolute/path/to/my_test_repo/trunk -m "my import message"
svn list svn+ssh://user@host/absolute/path/to/my_test_repo/trunk
...
NB where the components of user@host/absolute/path/to are:
- user: your username on the remote machine hosting your repository
- host: the hostname of the remote machine
- /absolute/path/to: you must specify the absolute path to your repository ($HOME will be evaluated on the machine to SSH'ing from
And you're away!